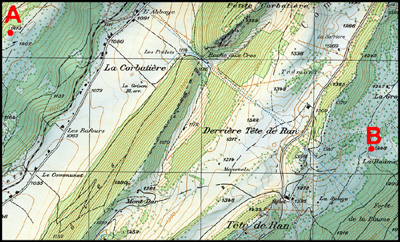
|
|
Build the profile.
Method for building a profile
Constructing a profile is rather easy and requires only a pencil, a ruler and a sheet of squared paper.
- Draw the profile line on the map.
- Lay the sheet of squared paper along the line and mark where each contour line crosses the profile line and indicate the value of the contour line.
- Measure up a scaled distance corresponding to the elevation of each marked point and put a point.
- Connect all your points.
Using this method, and with the help of the following indications, construct a topographic profile along A-B.
- Scale: 1 : 25 000
- Contour Interval: 10 m
- Index Contour: each tenth contour line
- On your profile 100 m elevation = 1 cm.
 Map for building the profile (Swisstopo)
You can download a printable version (DIN A4, format landscape) of the map here: Profile_test.jpg (474 Kb)
You should spend about 1/4h to carry out this exercise. There are two solutions to giving your work to the teacher/tutor (before the deadline he /sher gave you) back:
- Scan and send your profile as jpg picture (format: 600 X 280; 72 dpi) to your teacher/tutor by mail.
- Give him/her a photocopy of your original sheet of squared paper (on a DIN A4 white page).
Ask your tutor about the sample solution.
